

The Professional Guide to Insulation Testers: Ensuring Electrical Integrity in 2026
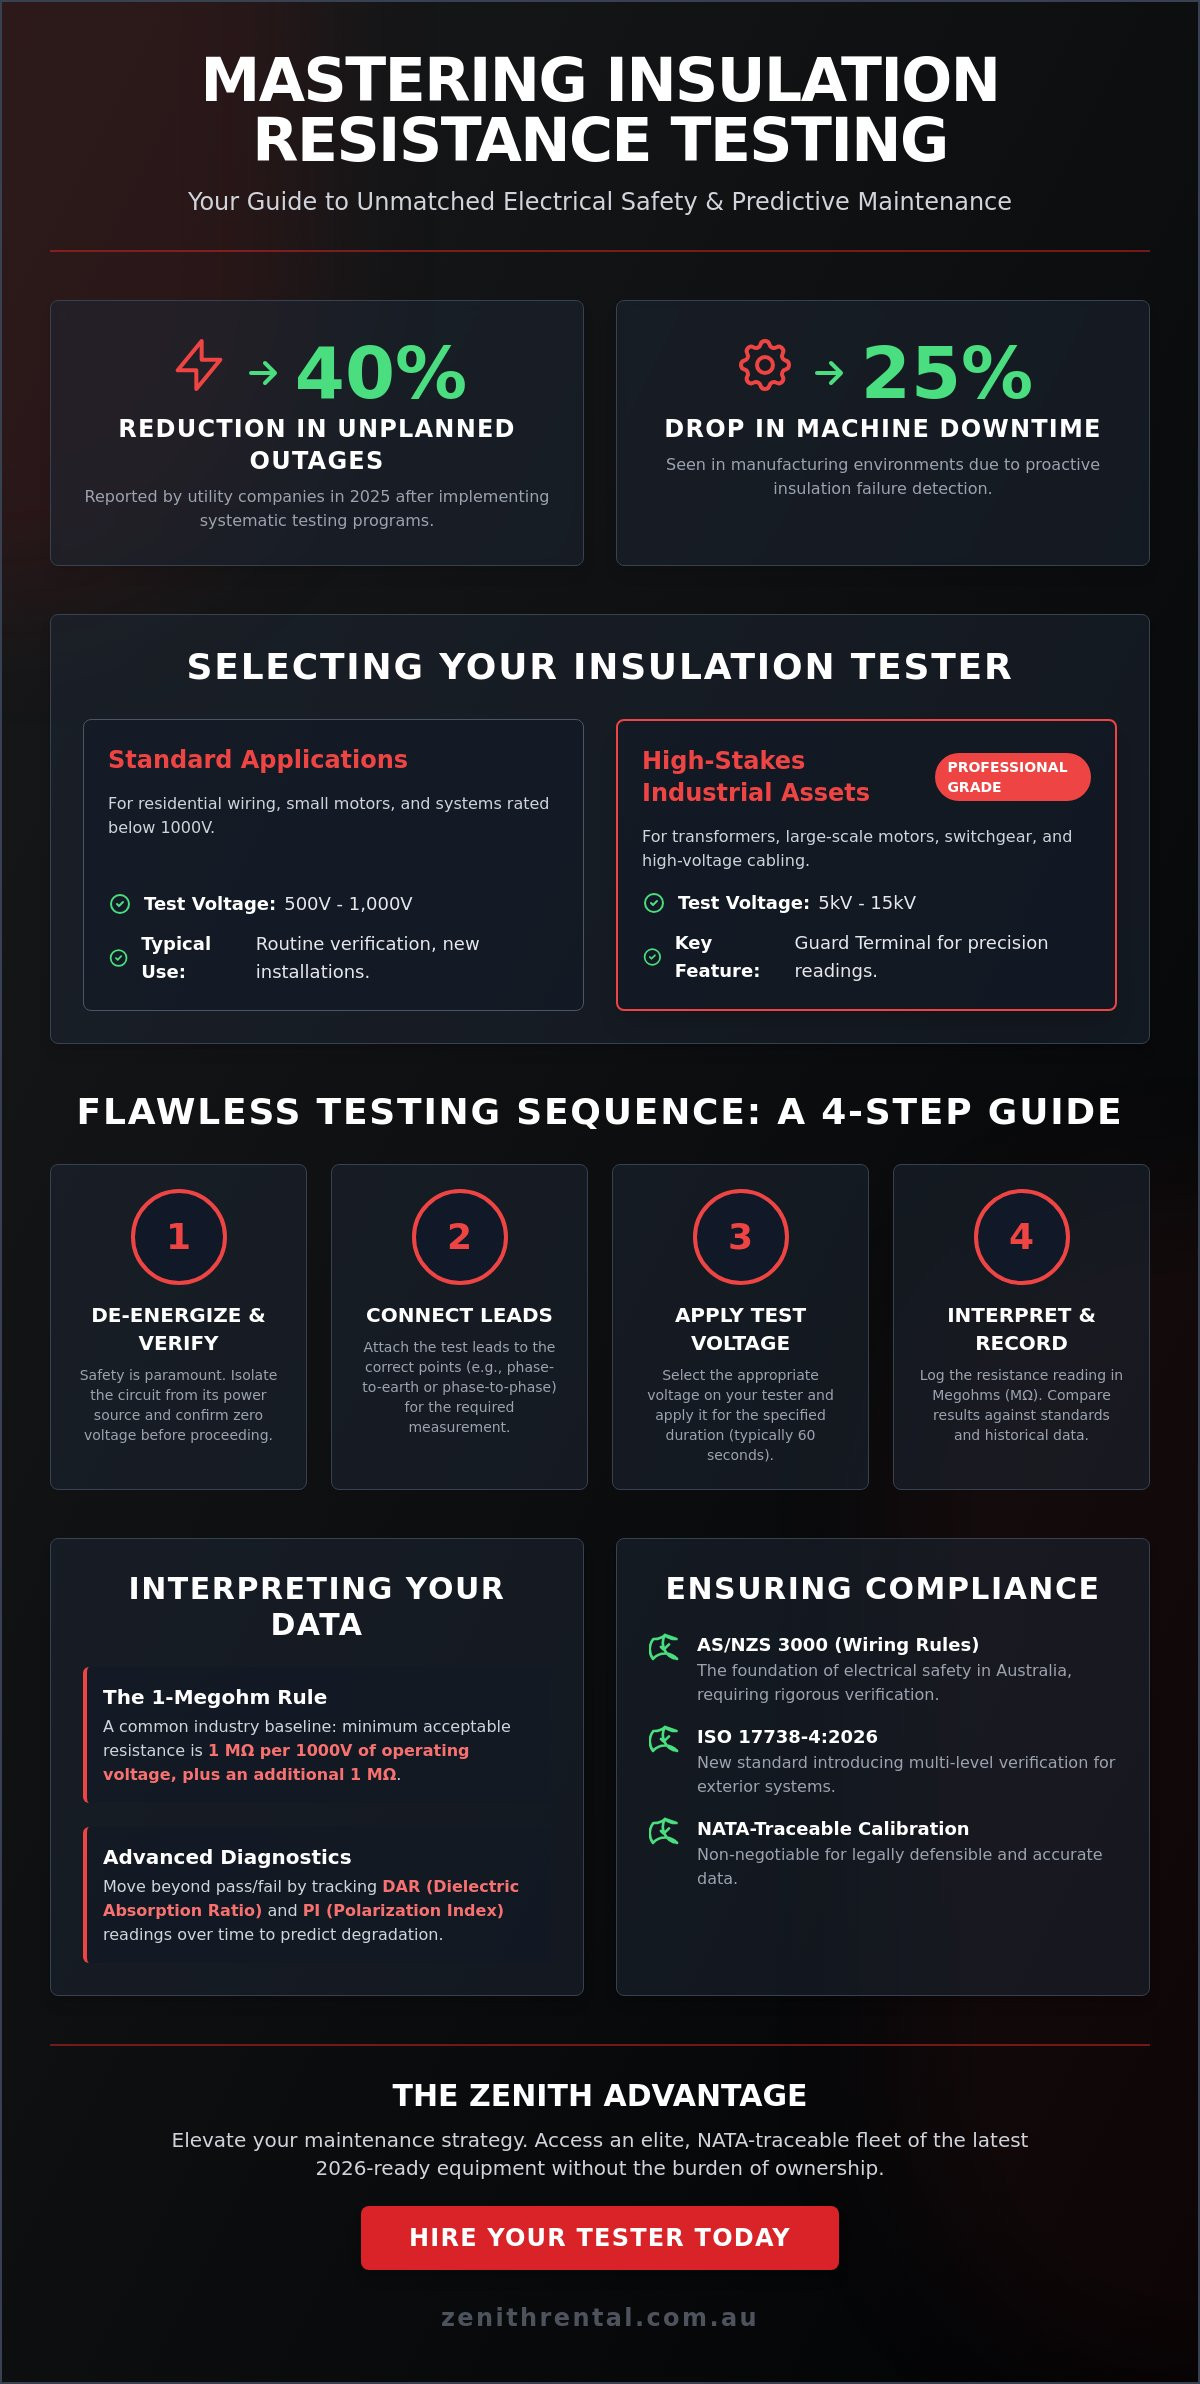
Utility companies reported a 40% reduction in unplanned electrical outages throughout 2025 after implementing systematic testing programs. This impressive statistic highlights that precision testing with a high-performance insulation tester is the zenith of predictive maintenance. You likely recognize that maintaining electrical integrity is a high-stakes endeavor where every detail matters. It's natural to feel a sense of hesitation when choosing between a 500V or 5kV test voltage, especially when the safety of your team and the longevity of elite assets are on the line. Interpreting complex DAR and PI readings shouldn't be a source of anxiety or a barrier to your professional success.
This comprehensive guide empowers you to master the art of resistance testing with absolute confidence. You'll learn how to select the perfect equipment for your specific industrial applications while ensuring seamless compliance with the latest standards, including the ISO 17738-4:2026 guidelines published in February. We'll provide a clear, step-by-step procedure for verifying cable integrity and navigating the sophisticated features of 2026's best-in-class equipment. From understanding the 18th Edition requirements to utilizing AI-driven diagnostics, this is your journey toward an unmatched standard of electrical safety and performance.
Key Takeaways
- Identify the specific voltage requirements for your assets to select a best-in-class insulation tester that ensures both precision and safety.
- Execute a flawless testing sequence by mastering de-energisation protocols and identifying the correct phase-to-earth or phase-to-phase connection points.
- Interpret your data with professional authority using the 1-Megohm rule and advanced trend-tracking to move beyond basic pass or fail results.
- Elevate your maintenance strategy by accessing elite, NATA-traceable equipment that guarantees compliance with the latest Australian industrial standards.
What is an Insulation Tester and Why is it Critical?
Precision is the hallmark of professional electrical maintenance. An insulation tester, frequently referred to as a Megohmmeter, is a sophisticated instrument designed to measure the electrical resistance of insulators by applying a high-voltage DC charge. While a standard multimeter is suitable for low-voltage continuity, it lacks the power to stress insulation to its breaking point. By injecting voltages ranging from 500V to 15kV, these testers identify the subtle leakage currents that precede catastrophic failure. This isn't just a logistical necessity; it's a proactive safeguard against short circuits, electrical fires, and expensive equipment damage.
Visual inspections are no longer sufficient for the complexity of modern industrial systems. Microscopic cracks, moisture ingress, and thermal degradation often remain invisible to the naked eye until it's too late. Statistics from October 2025 reveal that utility companies reported a 40% reduction in unplanned outages after implementing systematic testing. Similarly, manufacturing environments saw a 25% drop in machine downtime linked to insulation failure during the same period. At Zenith, we believe that monitoring insulation health is like tracking a vital sign for your most elite assets. It provides a clear window into the future reliability of your infrastructure, ensuring your operations remain at the pinnacle of performance.
Core Principles of Insulation Resistance
To master this discipline, you must understand how Ohm’s Law operates under high-stress conditions. When you activate your tester, the total current flowing through the insulation consists of three components: capacitive charging current, absorption current, and conduction current. The capacitive current starts high but drops almost instantly as the material charges. The absorption current takes longer to dissipate as molecules within the insulation align. Finally, the conduction current remains steady, representing the true resistance of the material. Environmental factors play a significant role here; even a minor increase in humidity or a 10-degree temperature shift can drastically alter your results, requiring meticulous logging for an unmatched level of accuracy.
Compliance and Australian Standards
In the Australian market, adherence to AS/NZS 3000, known as the Wiring Rules, is the foundation of electrical safety. This standard requires rigorous verification of new installations and periodic testing of existing industrial switchboards. The regulatory landscape continues to evolve, with the ISO 17738-4:2026 standard published in February 2026 introducing multi-level verification protocols for exterior systems. To pass a site audit with absolute confidence, your insulation tester must feature NATA-traceable calibration. Using pristine, calibrated equipment ensures that your data is not only accurate but also legally defensible, providing a seamless path to compliance and the ultimate peace of mind for your stakeholders.
Selecting the Right Insulation Tester for the Task
Selecting an insulation tester is a decision that defines the quality of your diagnostic journey. It's not merely about acquiring a tool; it's about matching elite hardware to the specific demands of your infrastructure. While a basic 1,000V tester like the Fluke 1507 is a staple for residential work, industrial environments require a more robust approach. High-stakes assets such as transformers or large-scale motors demand the power of 5kV to 15kV units. Choosing between analog and digital displays also reflects your specific needs; digital units offer precision and data logging, while analog scales remain preferred by some veterans for observing real-time needle movement during insulation breakdown.
For those managing high-value industrial assets, the presence of a Guard Terminal is non-negotiable. This feature eliminates surface leakage current errors that often plague high-resistance measurements, ensuring your readings reflect the internal health of the insulation rather than external contamination. Mastering the basics of insulation resistance testing requires understanding that different assets necessitate varying stress levels. To ensure your project benefits from the latest 2026 technology without the burden of ownership, you might consider the premium fleet available for hire, featuring pristine equipment from world-leading brands like Megger and Fluke.
Voltage Requirements by Asset Type
Matching the test voltage to the equipment's rated voltage is critical for both safety and accuracy. Household circuits and sensitive appliances typically require a 250V or 500V test to avoid overstressing components. In contrast, industrial motors and switchgear often necessitate a 1kV or 5kV baseline to reveal latent defects. For high-voltage cabling and utility-scale transformers, elite models like the Megger MIT1525 provide the 15kV capability required to meet modern Australian standards. Using an insufficient voltage can lead to a false sense of security, as it may fail to trigger the ionization of contaminants within the insulation.
Key Features for Professional Use
Modern professionals in 2026 look for features that provide a seamless user experience and actionable data. Look for instruments with:
- Internal Memory: Essential for data logging and long-term trend analysis of asset health.
- Automated Modes: Built-in Polarization Index (PI) and Dielectric Absorption Ratio (DAR) calculations remove the risk of manual error.
- Ruggedness: A CAT IV safety rating and high IP ratings are vital for the harsh conditions of Australian mine sites and industrial plants.
- Connectivity: Bluetooth integration allows for real-time reporting to cloud-based diagnostic platforms.
How to Perform an Insulation Test: A Step-by-Step Guide
Executing an Insulation resistance test is a precise orchestration of safety and technical discipline. It's a sequence that demands your full attention, ensuring that every reading is both accurate and safe. While the hardware provides the data, your adherence to a rigorous, step-by-step methodology ensures the integrity of the entire process. This professional rigour is what separates a routine check from an elite diagnostic assessment that protects high-value industrial assets from the risks of catastrophic failure.
Safety Protocols Before You Start
Safety is the foundation of every successful testing journey. Before your insulation tester even touches the circuit, you must verify a state of absolute zero energy. This begins with a meticulous Lockout Tagout (LOTO) procedure to prevent accidental re-energisation. Use a secondary, calibrated voltage indicator to confirm the "dead" state of the equipment. Your personal protection is paramount; pristine arc-flash clothing and insulated gloves are non-negotiable requirements for high-voltage environments. Remember that a test can leave a significant capacitive charge on the asset, making post-test discharge just as critical as the initial de-energisation.
The Testing Procedure
Follow these four definitive steps to ensure your results meet the highest Australian standards and provide the clarity needed for informed decision-making.
- Step 1: Lead Inspection. Examine your test leads for any signs of wear or contamination. Perform a continuity check to ensure the leads themselves aren't introducing errors into your high-resistance measurements.
- Step 2: Strategic Connection. Identify your test points with care. For ground fault detection, connect between the phase and earth. To check the integrity between conductors, perform a phase-to-phase test. Ensure the asset is grounded before making connections to manage stray charges.
- Step 3: Execution and Stabilisation. Select the appropriate voltage based on the asset type. Once the test begins, wait for the reading to fully stabilise. This usually requires a 60-second dwell time to allow capacitive and absorption currents to decay, leaving only the true conduction current.
- Step 4: Safe Discharge. After recording your reading, allow the insulation tester to discharge the circuit completely. Never disconnect the leads until the instrument indicates it's safe to do so.
Documenting these results is the final, vital component of the process. In line with the 18th Edition of the IET Wiring Regulations, professionals often perform a two-stage test: one before equipment connection and a secondary 250V test after connection. Benchmarking these figures against previous years allows you to track the gradual degradation of insulation. This data-driven approach transforms a single point in time into a comprehensive narrative of asset health, ensuring your infrastructure remains at its zenith of reliability.
Interpreting Results: Beyond the Pass/Fail Reading
A reading on an insulation tester is only as valuable as the professional's ability to decode the narrative it tells. While a simple "pass" might suffice for basic compliance, elite maintenance requires a deeper analysis of the data. For low-voltage systems, the 1-Megohm rule remains a foundational benchmark; it suggests that insulation should provide at least one megohm of resistance for every 1,000 volts of operating voltage. However, in three-phase systems, look for balance. Unmatched readings across the phases, even if they all sit above the minimum threshold, often signal the early stages of winding degradation or localized moisture ingress.
The true power of diagnostic testing lies in historical benchmarking. By comparing current results to data from previous years, you can predict a breakdown before it disrupts your operations. This predictive approach is highly effective; industry reports from October 4, 2025, confirmed that manufacturing environments saw machine downtime drop by 25% after deploying systematic predictive test schedules. To ensure your facility maintains this elite level of reliability, you can explore Zenith's premium rental fleet for the latest high-precision diagnostic instruments.
Advanced Diagnostics: PI and DAR Tests
When time allows for a more sophisticated journey into asset health, the Polarization Index (PI) and Dielectric Absorption Ratio (DAR) tests are indispensable. The PI test, which compares the 10-minute reading to the 1-minute reading, reveals whether the insulation is clean and dry. A ratio below 2.0 generally indicates potential issues, while a ratio above 4.0 reflects pristine condition. The DAR test offers a similar assessment in a shorter window, typically comparing 60-second and 30-second intervals. Integrating these results with data from a battery load tester provides a holistic view of your power integrity, ensuring that both your insulation and your backup power systems are operating at their zenith.
Troubleshooting Low Readings
Encountering a low resistance reading requires a calm, methodical response to distinguish between transient issues and permanent damage. Moisture contamination often presents as a low initial reading that may fluctuate, whereas thermal degradation typically results in a consistently low, stable value. Surface contamination on bushings and insulators can also skew your data; cleaning these components before a re-test often restores the reading to an acceptable range. If you suspect hidden physical damage, such as cracks in cable jackets, a "Step Voltage" test can be employed. By increasing the voltage in increments, you can observe if the resistance drops disproportionately, which confirms the presence of mechanical defects that a standard test might miss.
The Zenith Advantage: Why Hire Your Insulation Tester?
Choosing to hire an insulation tester represents a strategic shift from mere tool ownership to sophisticated asset management. When you partner with Zenith Rental, you gain immediate access to the world's most elite brands, such as Megger and Fluke, without the significant capital outlay required for a permanent purchase. A new Megger MIT525-2 5KV Advanced Insulation Tester, calibrated for 2025/2026, commands a purchase price of approximately $6,249.99. Hiring allows you to bypass these high entry costs while ensuring you always possess the exact voltage range required for your specific project. This flexibility is a core component of a sophisticated test equipment hire australia strategy where precision and efficiency are prioritized over the burden of inventory.
Every instrument in our fleet arrives with guaranteed NATA-traceable calibration. This isn't just a technical detail; it's your assurance of audit compliance and legal defensibility. In high-stakes industrial environments, the integrity of your data is your reputation. By utilizing our pristine, calibrated equipment, you ensure that every reading meets the rigorous requirements of AS/NZS 3000 and the latest 2026 standards. This commitment to quality provides a seamless path through site inspections, allowing you to focus on the high-performance results your clients expect.
Eliminating Maintenance Overhead
Managing a private fleet of sensitive instruments involves a constant cycle of logistical planning and hidden costs. When you hire, you completely eliminate the annual expense and administrative headache of coordinating calibration schedules. You don't have to worry about technology obsolescence or the depreciation of expensive hardware. Instead, your team always has access to the latest firmware, enhanced safety features, and the most recent CAT IV safety ratings. Our national delivery network ensures that the right tool reaches your site exactly when required, maintaining the momentum of your project and ensuring an unmatched level of operational efficiency.
Professional Support and Expert Advice
The Zenith experience extends far beyond the hardware itself. You're supported by an elite concierge team with deep technical knowledge, ready to assist you in selecting the most appropriate insulation tester for your specific industrial application. We understand that reducing downtime is your top priority. That's why we provide ready-to-use equipment that has been meticulously inspected and prepared for immediate deployment. This personalized approach ensures a smooth, logical flow from the initial booking to the final report. Experience the pinnacle of testing. Hire a premium insulation tester from Zenith Rental today and ensure your infrastructure remains at its absolute zenith.
Reaching the Pinnacle of Electrical Reliability
Masterful electrical maintenance is a journey toward absolute precision. You've explored how to select the correct voltage and decode the narrative within DAR and PI readings. Using a high-performance insulation tester isn't just a compliance task; it's a commitment to the longevity of your industrial infrastructure. By following the rigorous steps outlined in this guide, you protect your team and ensure your assets operate at their peak. This proactive approach transforms technical data into a powerful tool for long-term success.
Elevate your next project with a partner that values quality as much as you do. Our elite fleet features pristine instruments from Megger, Fluke, and Hioki, each arriving with NATA-traceable calibration for your total peace of mind. We provide seamless nationwide delivery across Australia to keep your timeline on track. Experience the pinnacle of service and technical excellence with Zenith Rental. Browse Our Elite Range of Insulation Testers for Hire to secure the ultimate diagnostic tools for your team. Your commitment to excellence deserves nothing less than the best equipment available.
Expert Insights on Insulation Testing
What is a good insulation resistance reading?
A reading of 100 Megohms or higher generally indicates healthy insulation for new equipment, though the 1-Megohm rule is the absolute minimum for low-voltage systems. For older assets, you should look for consistency rather than a specific number. If your readings drop by 50% or more over a single maintenance cycle, it's a clear signal that the insulation is degrading and requires professional attention.
Can I use an insulation tester on a live circuit?
No, you must never use an insulation tester on a live circuit. Applying high-voltage DC to a system that's already energized is extremely dangerous and will likely destroy the instrument's sensitive internal components. Always verify a "dead" state with a secondary voltage indicator before you begin your diagnostic journey to ensure a safe and seamless experience for your team.
What voltage should I use for insulation testing?
Select a test voltage that is typically twice the equipment’s rated operating voltage. For standard 240V Australian circuits, a 500V test is appropriate, while 415V industrial systems require a 1,000V stress test. High-voltage assets like 11kV transformers demand elite 5kV or 10kV units to properly expose latent defects that lower voltages simply won't trigger during a routine inspection.
What is the difference between an insulation tester and a multimeter?
The primary difference lies in the output voltage used to measure resistance. A standard multimeter uses a low-voltage battery, usually around 9V, which is insufficient for stressing an insulator. An insulation tester applies high-voltage DC, ranging from 500V up to 15kV, to measure the leakage current across high-resistance materials that a multimeter would incorrectly identify as an open circuit.
How often should insulation resistance testers be calibrated?
Professional standards recommend that your testing equipment be calibrated every 12 months. Annual calibration ensures that your measurements remain accurate and that your site audits comply with NATA-traceable requirements. Utilizing a pristine, recently calibrated instrument from a premium fleet eliminates the risk of data errors and maintains the elite status of your predictive maintenance program.
Why do my insulation resistance readings change with temperature?
Insulation resistance is inversely proportional to temperature; as the material gets warmer, its resistance naturally decreases. A 10-degree Celsius increase in winding temperature can cut your resistance reading in half. To maintain an unmatched level of accuracy, you should always record the ambient temperature and use a correction factor to normalize your data to a standard 20°C or 40°C baseline.
What is a Polarization Index (PI) test?
A Polarization Index test is the ratio of the 10-minute resistance reading to the 1-minute reading. This diagnostic tool reveals the presence of moisture or contaminants within the insulation based on how the molecules align under stress. A ratio above 2.0 is usually considered acceptable, while an elite reading above 4.0 indicates that the insulation is in pristine, dry condition and operating at its zenith.
How long should an insulation resistance test take?
A standard spot test typically requires 60 seconds to allow the reading to stabilize. This duration ensures that initial capacitive charging currents have subsided, leaving only the true conduction current for your report. For more comprehensive assessments like the PI test, you'll need to maintain the voltage for 10 minutes to accurately capture the material's absorption characteristics and ensure a thorough evaluation.